The printing is already underway and you’re excited to see how your 3D model will come out. However, it gets messed up midway for some unknown reason. Frustrating, right? Here are the possible problems that may be causing this problem:
- Is the support structure still intact?
- Did the hot end stop printing mid-way?
- Did the print break free from the print bed?
- Do you hear popping noises in the nozzle?
- Do you see smoke coming from the nozzle?
- Are the motors emitting a clicking sound?
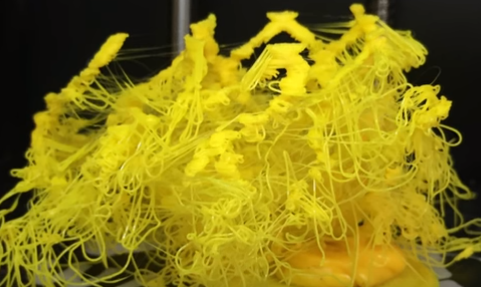
Is the support structure still intact?
The support structure is important, especially if you are printing complex prints. It serves as beams to support the overhanging parts of your print from sagging or falling.
If you find that the support structure is starting to look uneven, stringy, or cracked during mid-print, it may be that the supports are failing. When the supports fall apart, it becomes a domino effect as the filament being extruded thereafter will ruin your print.
There are several styles of support structures that are just meant to be flimsy but easier to remove. Lines and zig zags are such examples. On the other hand, densely designed supports such as grids and blocks tend to be more rigid but are harder to remove.
Aside from weak support, there are several reasons why the support structure is not coming out great. Platform adhesion is also crucial to ensuring that supports are bonded to the print platform. Avoid printing supports without it.
Supports made of lower quality or older filaments also tend to break down easily.
Finally, loose nuts and bolts can also affect your printing since it can cause the printer to move or vibrate more than usual.
Solution: While there is nothing that can fix your ruined, there are several solutions to make sure your next one comes out smoothly.
- Boost the support thickness: We mentioned above that thick supports tend to be more rigid and stable, giving your print a steadier platform.
- Opt for more rigid support designs: There is nothing wrong with using thin supports especially if the overhangs of your print isn’t that heavy. However, if you know that your print would need plenty of support, choose denser support structures.
Did the hot end stop printing mid-way?
When the hot end stops extruding filament in the middle of printing, the causes can range from the simple to the complex. It could that you don’t have enough filament or there is something wrong with the hot end itself.
Solution: The solutions are similar to when nothing is coming out of the extruder at the beginning of print.
- Check your filament: When the hot end is not extruding, it is highly likely that it is caused by filament issues. Make sure that you check if you still have enough filament. It may sound like a simple enough mistake, but it still happens to the best of us. It could also be that the filament has been stripped or snapped. You could check out how to deal with this in our dedicated troubleshooting section on how to fix stripped filaments or snapped filaments.
Did the print break free from the print bed?
The print not sticking to the print bed is one of the most common problems that could happen while printing. It could happen just as you are starting with the first layer or when your print is almost at the final frontier, which makes it even more heartbreaking.
There are times that the print just refuses to bond to the print platform. In this case, you would need something textured to get it to bond to the surface.
It could also be that there are discrepancies in the levelling of the print platform or the distance between the nozzle and platform.
In any of the above cases, the first tell-tale sign is if you see a string-like piece of filament either on the top of your print or if your whole print is made up of stringy filaments. Another sign is if you see parts of your model scattered on the print platform.
Solutions: This problem is caused by a great number of things, so the solutions also vary.
- Amp up the texture and adhesion: It will be hard for your print to stick to the surface with a slippery base. Make sure that it is glued firm to the print bed by applying a thin layer of stick glue to the print platform. BuildTak sheets are also a classic fix since it is easy to install and fits most 3D printers. Other 3D printing experts also swear by Dimafix Pen, which offers adhesion for beds heated above 60ºC.
- Make sure that the print bed is levelled: Leveling your print bed varies depending on the 3D printer you use. Some models are equipped with an auto levelling system and some require a manual approach. You can check the printer’s manual for how to level your print bed or you can also check out our comprehensive guide to levelling print beds here.
- Adjust the nozzle height: If your nozzle is too high, it would be hard for the extruded filament to stick to the platform. Set the nozzle height through your printer’s settings. Make sure that the height is just right since if it is set too low, it can brush against the print.
Do you hear popping noises in the nozzle?
Popping noises in the nozzle does not signify that the filament is cooking unlike with popcorn. There could be a problem with your filament or retraction settings.
Solutions: It is easy to narrow down what’s causing the popping noise. Here are the parts that you should check to solve this:
- Dry the filament: Filament absorbs too much moisture in the air when you leave it out in the open for too long or store it improperly. It is important to dry the filament or replace it with a new one.
- Reduce the retraction: If the retraction settings are too high, it could suck in air which then causes noises that resemble more like whistling than a pop.
Do you see smoke coming from the nozzle?
Moisture can cause your nozzle to smoke or emit steam. If this happens to you, a filament that has absorbed moisture is the most likely culprit.
Solution: Check your filament for moisture.
- Dry the filament: Just like with the problem above, make sure that your filament is dry before using it for printing. Moisture ruins prints so while nozzle smoke is usually pretty harmless, you would want to still dry your filament or replace it with a new one if you want to prevent unsightly deformities and marks on your print.
Are the motors emitting a clicking sound?
If you hear clicking motors, stop whatever it is you’re printing and check out what’s wrong with your printer since the results are not going to be optimal anyway. It usually happens when the motor is stalled, so it would keep on trying to rotate but couldn’t, which causes it to make clicking noises.
Solutions: It could be caused by a great number of things so the solution depends on the cause of the problem.
- Maintain the upkeep of the rods, lead-screws, and bearings: There could not be enough lubrication for the motor to move. Clean and oil the rods, lead-screws, and bearings to get them moving again.
- Reduce the motor speed: Your motors could be moving too fast than they can handle.
- Make sure that the axes are aligned: If something is blocking the movement of either axis, it could bring on clicking noises. Make sure that they are aligned and that nothing is blocking them.
- Check if the motor is overheated: The motor could start clicking if it has been overworked and overheated. Stop your printing and let your machine cool.
- Supply the proper current: If you have insufficient current powering your machine, adjust the Vref on the stepper driver.