If you’ve ever printed a 3D print that’s bigger than your 3D printer, then you’re all too familiar with cutting up 3D models and gluing them together during post-processing.
However, there’s more to gluing 3D prints together than meets the eye. It’s not like your kindergarten art project where you slap on glue and join the pieces together. There are several gluing methods with their own set of pros and cons. Would you want to sacrifice quality over stability? Do you want to get an almost seamless surface? Find out the best 3D print bonding method for your next 3D printing project in our latest blog post.
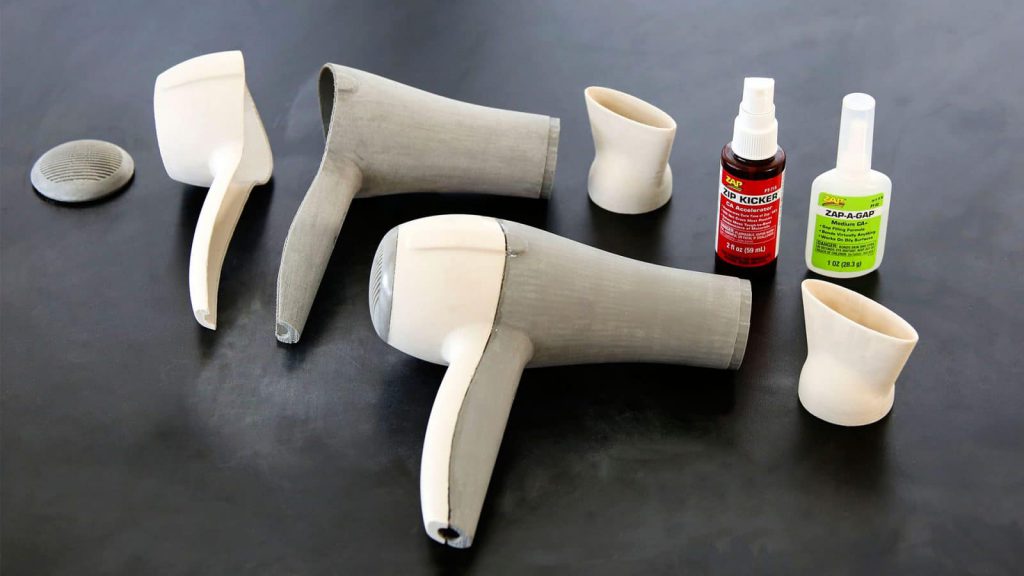
1. Superglue
Sometimes it is as easy as applying glue to your 3D prints and attaching them. The advantages to this method are that it’s fast while also giving a strong bond and almost invisible seam. However, its advantage of being fast to cure is also its caveat as it sticks in a matter of seconds giving you a small room for mistakes.Most 3D printer filaments are compatible with superglue except for flexible materials.
Bonding preparation: 5/5
For rough and uneven surfaces, you need to sand them with a fine-grit sandpaper. Clean the surface thoroughly with alcohol afterwards and let it dry. If the surface is smooth, you can just do the latter.
Safety: 4/5
The only health risk to superglue is if it gets on the skin or your work desk it can be hard to remove. To avoid this from happening, wear safety gloves to protect your skin and protect your table with old newspapers. As this is a toxic substance, keep it away from children and pets.
Filament compatibility: 4.5/5
It is compatible with most materials except flexibles.
2. Epoxy
Epoxy is another bonding agent that’s easy to find. In 3D printing, it works in two ways: to bond pieces together and fill in holes or seams to make your print’s surface more seamless.
However, it’s not as easy to use as super glue. Epoxy has two components (epoxy resin and hardener) that need to be mixed before use. They also require a certain ratio so it’s best to consult the manufacturer’s guidelines before use.
Once the two components are mixed then you can use it like any other glue. Apply it to two parts that you need to bond. The good thing about it is that it doesn’t dry immediately so you have time to align the pieces together. Curing takes a few minutes to hours depending on the epoxy used and the mixing ratio.Bonding preparation: 3/5
Epoxy has two components that need to be mixed before application. Once mixed, it works like a dream as you only need to apply it to the surface of your 3D parts. It can also be applied in thick layers to ensure a strong bond. It is better suited for 3D printing projects with curved and complicated surfaces.
Safety: 4/5
There are still risks to using epoxy as it is still a toxic material. Refer to its manual and safety instructions as the risks and measures vary. Some epoxy can also turn warm upon mixing so make sure to wear safety gloves to protect the skin.
Filament compatibility: 5/5
It can be used on all filaments but it leaves a rigid seam on flexible materials.3. Acetone
Acetone works in a different way than glue. Instead of acting as a bonding agent, it chemically melts the surface of 3D prints so that the melted surfaces can stick to each other when it dries. This method provides an exceptional bond and invisible seam. However, this is only compatible with ABS and HIPS as most filaments won’t be able to withstand acetone.
To use acetone on your 3D prints, you need to carefully and sparingly apply it with a small brush. Be careful not to use too much as it can ruin the 3D prints especially when they’re thin.
Acetone will melt the surface of the 3D print. When you stick two parts together, they will eventually fuse together when it hardens, creating a completely seamless bond. However, bonding time may take from a few minutes to several hours, so make sure that you secure both parts together with tapes or clamps.
Bonding preparation: 2/5
As with any bonding method, the 3D prints should be cleaned and sanded before gluing parts together. You have to be careful when using acetone as a solvent to melt your 3D prints. Make sure that you only use it sparingly and carefully to avoid ruining your 3D prints.Safety: 2/5
Acetone is flammable so make sure to avoid working near hot surfaces, open flames, and sparks. It also has noxious fumes so it’s recommended to work in a well-ventilated place or outdoors.
Filament compatibility: 2/5
Acetone is the perfect gluing method for ABS and HIPS as it provides a strong and virtually seamless bond.4. Hot glue gun (glue sticks or PLA filaments)
A hot glue gun is another easy way to bond two 3D prints together. It provides a solid bond, however, its glue is visible so it may not be a good option for arts and crafts projects. It also only works with parts that have a thickness of 2-3mm.Hot glue cools down in mere seconds so there’s no need to clamp the parts together.
Another good ammo for glue guns are 3D-printed PLA sticks (which you can download here). This offers a very solid bond and a good colour match between the glue and the surface of the print.Bonding preparation: 5/5
You only need to clean up and sand the surface before gluing.Safety: 4.5/5
Glue guns run hot. Take care not to burn yourself.
Filament compatibility: 5/5
It works with all rigid materials, such as ABS, PLA, PETG, and more.5. 3D pen
If you have a 3D pen, you can use it like a glue gun to stick 3D prints together. It offers a seamless bond that makes your 3D prints look like they were printed in one piece. Keep in mind though that it doesn’t offer a very good bond so it’s best to use it for non-functional items.One thing to note is that it only works if you use the same filament on the 3D pen as the 3D print.
Bonding preparation: 5/5
Similar to a glue gun, you only need to clean and sand the surface before using the 3D pen. Make sure to use the same filament as your 3D print.Safety: 4.5/5
3D pens can burn you. Be careful about getting burned.