
Source: Ultimaker
3D prints are usually designed to be hollow for faster printing, less filament usage, and cheaper overall costs. Otherwise, it would take forever for a 3D print to be finished and you would end up using far more filaments than necessary. The downside to this is that it makes the object weak and unstable.
3D printing infill is the secret to stronger and more stable 3D prints. Infill takes up the empty space within a 3D print to reinforce and increase the volume. It is usually concealed from view by the outer shell of the model. However, some use it for aesthetics and allow it to be seen through the walls of the print.
The infill can be printed in different densities and patterns depending on the structural needs of the print.
How to choose infill density

Source: Enabling the Future
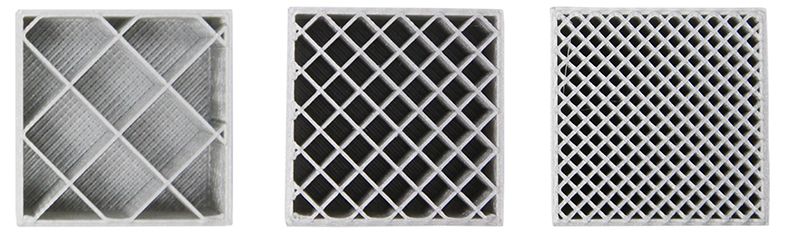
There are different choices for infill density in slicer programs. You can choose from 0% (no infill) to 100% (solid interiors). The higher the density is, the more structurally sound your 3D print is going to be. However, this also translates to longer printing times and higher production costs.
The most common infill densities are between 20% and 25% since it hits the sweet spot between the right durability and filament usage. For those who are cutting down costs, they can opt for 10-15% densities , especially if their print doesn’t require strength and support.
If filament usage is not a concern, you can go between 30% and 50% for strong and stable 3D prints. If structural integrity is of utmost priority, you can go as high as 100% infill density for super-solid 3D prints.
How to choose an infill pattern

Source: 3DPrinting.com
There are two types of infill patterns: those that are used for structure and aesthetics. Each pattern has its own advantages and disadvantages.
Infill patterns for structures strengthen a print. When beefing up a 3D print, infill patterns with lines, grids, honeycombs, concentric, and rectilinear design work best. They fill up the hollow space of the 3D print, adding to its volume.
Choosing the right infill pattern for your 3D print also depends on what you’ll be printing and the strength that it needs. 3D honey and Hilbert designs are suitable for block prints while archi and octi patterns are perfect for round and circle prints.
Infill Pattern Tips & Tricks
Choose a rectangular pattern if…
- You want the easiest pattern to print since it has minimal bridging
- You want consistent rigidity in all directions of your 3D print
Choose a wave or wiggle pattern if…
- You are printing a flexible model
- You want your print to be able to compress or twist while still having structurally stability
Choose a triangular pattern if…
- You want to strengthen the parts in the direction of the shell
- You don’t mind longer print time
Choose a 3D honeycomb pattern if…
- You want better strength in all directions than a rectangular pattern
- You don’t want longer print time
Infill tips & tricks
- Increase shell thickness instead. You can save up on filament consumption by lowering the density and increasing the shell thickness instead. The shell is the outer wall of the 3D print. By increasing its thickness, the print grows in strength and impact resistance. In some slicer programs, you can also choose the areas of the shell to increase the thickness of. Keep in mind that post-processing can reduce the shell thickness and therefore also affect its strength.
- Minimise support infill. Since supports are meant to be removed from the model after printing, you can get away with using the lowest infill density on these areas.
- Prevent infill issues. The most common infill problem is sponging. This is usually caused by underextrusion. Prevent this problem happening by solving your extrusion problems. Another problem is the infill not connecting to the outer walls of the print. It is either caused by underextrusion or incorrect slicer settings. Adjust the “infill overlap” settings in your slicer. Set it to 0% and keep increasing incrementally until the problem is fixed.
Get stronger 3D prints consistently! Try our X3D Pro filaments today!
Infills can only do so much to improve the strength of a 3D print. The ultimate secret to successful 3D prints lies in the material you use. Cheap 3D printer filaments are more likely to result in failed prints despite the best 3D printing practices. Meanwhile, topnotch filaments will get you strong and accurate 3D prints each time. If you want terrific 3D printer filaments at reasonable prices, check out our range of X3D Pro filaments.
For enquiries, you can call us at 6380 7488 and x3d@x3d.com.au.